Semantic Scholar API - Tutorial
Get Started with Semantic Scholar API
Learn to search for papers and authors, download datasets, and more

Introduction
The Semantic Scholar REST API uses standard HTTP verbs, response codes, and authentication. This tutorial will teach you how to interact with the API by sending requests and analyzing the responses. All code examples are shown in Python. If you prefer a code-free experience, follow along using the Semantic Scholar Postman Collection, which lets you test out the API on Postman, a popular and free API testing platform.
What is an Application Programming Interface (API)?
An API is a structured way for applications to communicate with each other. Applications can send API requests to one another, for instance to retrieve data.
Each API request consists of:
- An API endpoint, which is the URL that requests are sent to. The URL consists of the API’s base URL and the specific endpoint’s resource path (See Figure 1).
- A request method, such as GET or POST. This is sent in the HTTP request and tells the API what type of action to perform.
![a diagram displaying the base url [https://api.semanticscholar.org/graph/v1/] and resource path [/paper/search]](https://cdn.prod.website-files.com/605236bb767e9a5bb229c63c/65553b12d016d1fc01d52f2d_GS_endpointUrlExample.png)
Figure 1. The endpoint for Semantic Scholar’s paper relevance search endpoint.
Each API request may also include:
- Query parameters, which are appended to the end of the URL, after the resource path.
- A request header, which may contain information about the API key being used.
- A request body, which contains data being sent to the API.
After the request is sent, the API will return a response. The response includes a status code indicating whether the request was successful and any requested data. The response may also include requested data.
Common status codes are:
- 200, OK. The request was successful.
- 400, Bad Request. The server could not understand your request. Check your parameters.
- 401, Unauthorized. You're not authenticated or your credentials are invalid.
- 403, Forbidden. The server understood the request but refused it. You don't have permission to access the requested resource.
- 404, Not Found. The requested resource or endpoint does not exist.
- 429, Too Many Requests. You've hit the rate limit, slow down your requests.
- 500, Internal Server Error. Something went wrong on the server’s side.
The Semantic Scholar APIs
Semantic Scholar contains three APIs, each with its own unique base URL:
- Academic Graph API returns details about papers, paper authors, paper citations and references. Base URL: https://api.semanticscholar.org/graph/v1
- Recommendations API recommends papers based on other papers you give it. Base URL: https://api.semanticscholar.org/recommendations/v1
- Datasets API lets you download Semantic Scholar’s datasets onto your local machine, so you can host the data yourself and do custom queries. Base URL: https://api.semanticscholar.org/datasets/v1
See the Semantic Scholar API documentation for more information about each API and their endpoints. The documentation describes how to correctly format requests and parse responses for each endpoint.
How to make requests faster and more efficiently
Heavy use of the API can cause a slowdown for everyone. Here are some tips to avoid hitting rate limit ceilings and slowdowns when making requests:
- Use an API Key. Users without API keys are affected by the traffic from all other unauthenticated users, who share a single API key. But using an individual API key automatically gives a user a 1 request per second rate across all endpoints. In some cases, users may be granted a slightly higher rate following a review. Learn more about API keys and how to request one here.
- Use batch endpoints. Some endpoints have a corresponding batch or bulk endpoint that returns more results in a single response. Examples include the paper relevance search (bulk version: paper bulk search) and the paper details endpoint (batch version: paper batch endpoint). When requesting large quantities of data, use the bulk or batch versions whenever possible.
- Limit “fields” parameters. Most endpoints in the API contain the “fields” query parameter, which allows users to specify what data they want returned in the response. Avoid including more fields than you need, because that can slow down the response rate.
- Download Semantic Scholar Datasets. When you need a request rate that is higher than the rate provided by API keys, you can download Semantic Scholar’s datasets and run queries locally. The Datasets API provides endpoints for easily downloading and maintaining Semantic Scholar datasets. See the How to Download Full Datasets section of the tutorial under Additional Resources for more details.
Example: Request paper details (using Python)
Now we’ll make a request to the paper details endpoint by running Python code. Complete the steps listed under Prerequisites below before proceeding. If you prefer to follow along in Postman, the same request in Postman is located here. For more examples of API requests using Python, see the section Make Calls to the Semantic Scholar API.
Prerequisites:
- Install Python if it is not already on your machine.
- Install pip, Python's package manager, if it is not already on your machine.
According to the Academic Graph API documentation, the paper details endpoint is a GET method and its resource path is /paper/{paper_id}.
![a diagram displaying the base url [https://api.semanticscholar.org/graph/v1/] and resource path [/paper/search]](https://cdn.prod.website-files.com/605236bb767e9a5bb229c63c/66e9d70caf2154892b901a69_paper%20details%20path.png)
Figure 2. Each endpoint's resource path is listed in the API documentation.
When combined with the Academic Graph base URL, the endpoint’s URL is: https://api.semanticscholar.org/graph/v1/paper/{paper_id}
The curly brackets in the resource path indicate that paper_id is a path parameter, which is replaced by a value when the request is sent. Accepted formats for the value of paper_id are detailed in the Path Parameters section of the documentation.
![a diagram displaying the base url [https://api.semanticscholar.org/graph/v1/] and resource path [/paper/search]](https://cdn.prod.website-files.com/605236bb767e9a5bb229c63c/66e9dbb3be85dfbfe383219a_paper%20details%20parameters.png)
Figure 3. Accepted formats are listed in the Path Parameters section.
The Query Parameters section of the documentation only lists a single optional parameter: fields. The fields parameter takes a string of comma-separated field names, which tell the API what information to return in the response.
![a diagram displaying the base url [https://api.semanticscholar.org/graph/v1/] and resource path [/paper/search]](https://cdn.prod.website-files.com/605236bb767e9a5bb229c63c/67003dbebdebc17eb7101eb8_query%20params%20fields.png)
Figure 4. Fields that can be returned in the response are listed in the Response Schema section of Responses.
For our Python request, we'll query the same paper ID given in the documentation’s example. We'll request the paper’s title, the year of publication, the abstract, and the citationCount fields:
import requests

paperId = "649def34f8be52c8b66281af98ae884c09aef38b"

# Define the API endpoint URL
url = f"http://api.semanticscholar.org/graph/v1/paper/{paperId}"

# Define the query parameters
query_params = {"fields": "title,year,abstract,citationCount"}

# Directly define the API key (Reminder: Securely handle API keys in production environments)
api_key = "your api key goes here"  # Replace with the actual API key

# Define headers with API key
headers = {"x-api-key": api_key}

# Send the API request
response = requests.get(url, params=query_params, headers=headers)

# Check response status
if response.status_code == 200:
   response_data = response.json()
   # Process and print the response data as needed
   print(response_data)
else:
   print(f"Request failed with status code {response.status_code}: {response.text}")
Note that this request is using an API key. The use of API keys is optional but recommended. Learn more about API keys and how to get one here.
We are using the Python Requests library to send the request. So we know the response has a property named status_code that returns the response status. We check the status_code and either print the successfully returned data or the error message.
See the API documentation for how the response is formatted. Each Status Code section expands with further details about the response data that is returned.
![a diagram displaying the base url [https://api.semanticscholar.org/graph/v1/] and resource path [/paper/search]](https://cdn.prod.website-files.com/605236bb767e9a5bb229c63c/66e9dfc4fd5ef4d187cdfa62_paper%20details%20responses.png)
Figure 5. The Responses section describes how responses are formatted.
When the request is successful, the JSON object returned in the response is:
{
    "paperId": "649def34f8be52c8b66281af98ae884c09aef38b",
    "title": "Construction of the Literature Graph in Semantic Scholar",
    "abstract": "We describe a deployed scalable system for organizing published ...",
    "year": 2018,
    "citationCount": 365
}
See the Make Calls to the Semantic Scholar API section for more Python examples using the paper search, paper recommendations, and authors endpoints.
Make Calls to the Semantic Scholar API
Use Case: Let's suppose you are an early-career academic researcher interested in doing research in generative AI. You would like to learn about recent research developments in the generative AI field and discover what areas are most exciting for future research.
How to use Semantic Scholar: You can do a keyword search for relevant papers on generative AI. You can pick out a few papers that seem the most interesting, then recommend more papers that are similar to them. You can examine the list of recommended papers to see which are the most cited and which authors worked on them, then look up other research by those same authors.
Let’s walk through those scenarios together. We’re going to use Python, but you can follow along using the Postman collection.
Step 1: Keyword search for relevant papers
Use Case: We want to learn more about generative AI, so we’ll start by searching for recent generative AI research papers.
Two Academic Graph API endpoints use Semantic Scholar’s custom-trained ranker to perform keyword searches: the paper relevance search endpoint and the paper bulk search endpoint.
Paper bulk search should be used in most cases because paper relevance search is more resource intensive. The paper relevance search endpoint is able to return more detailed information about each paper’s authors, its referenced papers, and the papers that cite it. The paper bulk search supports sorting and special syntax in the query parameter. In this scenario, we will use the paper bulk search endpoint.
Get the Endpoint URL
The Academic Graph API endpoint’s base URL is: http://api.semanticscholar.org/graph/v1/
Whenever we want to retrieve data from or send data to an endpoint in the Academic Graph, that’s how the URL starts. The API documentation for paper bulk search endpoint lists its resource path as /paper/search/bulk, so the endpoint’s full URL is:
- http://api.semanticscholar.org/graph/v1/paper/search/bulk
Set the Query Parameters
The paper bulk search API documentation lists the following query parameters:
- query sets the search term
- token automatically handles pagination
- fields determines what data the API endpoint will return to you
- sort allows users to sort the results by the paperId, publicationDate, or citationCount fields
- publicationTypes filters results by paper publication type (e.g. journal articles)
- openAccessPdf filters results by whether they contain public PDFs of papers
- minCitationCount filters results by whether they have at least a given number of citations
- publicationDateOrYear filters results by a date range
- year filters results by a year range
- venue filters results by publication venue
- fieldsOfStudy filters results by the paper’s field of study
Only the first query parameter, query, is required in every request. The token query parameter isn’t included in the original request. Instead, it is returned in the response to the original request, then included in subsequent requests to automatically handle pagination.
In our request, we will include 3 query parameters: query, fields, and year:
- Use quotation marks in the query to search for the phrase “generative AI”. See the Additional Help section for more examples of using search query syntax.
- In fields, include the title, url, type of publication, date of publication, and link to the pdf of the paper. Separate field names with commas, without spaces. See the API documentation for all available field names.
- Filter for papers published during or after the year 2023 by using the “2023–” syntax.
These query parameters are appended to the end of the URL, so the complete URL looks like this: http://api.semanticscholar.org/graph/v1/paper/search/bulk?query="generative ai"&fields=title,url,publicationTypes,publicationDate,openAccessPdf&year=2023-
Send the Request
The URL is long and hard to read, so in our code we’ll break it up a bit:
import requests
import json

# Specify the search term
query = '"generative ai"'

# Define the API endpoint URL
url = "http://api.semanticscholar.org/graph/v1/paper/search/bulk"

# Define the query parameters
query_params = {
    "query": '"generative ai"',
    "fields": "title,url,publicationTypes,publicationDate,openAccessPdf",
    "year": "2023-"
}

# Directly define the API key (Reminder: Securely handle API keys in production environments)
api_key = "your api key goes here"  # Replace with the actual API key

# Define headers with API key
headers = {"x-api-key": api_key}

# Send the API request
response = requests.get(url, params=query_params, headers=headers).json()
The request is formatted and sent to the API endpoint, and the response is captured in the variable response.
According to the API documentation, if the request was successful, with status code 200, the response variable contains three fields:

Figure 6. The API documentation lists the data format of the response schema.
The total parameter is an estimate of how many papers were found that matched the search request, the token parameter is used for pagination, and the data parameter contains the data returned from the endpoint. Note that the paper bulk search endpoint’s use of tokens to handle pagination is unlike the paper relevance search endpoint’s use of the offset and limit query parameters for pagination.
The next part of our code saves the data returned from the endpoint to a json file titled papers.json and prints the code’s progress to the console. If the token parameter is present, fetch the next batch of responses.
print(f"Will retrieve an estimated {response['total']} documents")
retrieved = 0

# Write results to json file and get next batch of results
with open(f"papers.json", "a") as file:
    while True:
        if "data" in response:
            retrieved += len(response["data"])
            print(f"Retrieved {retrieved} papers...")
            for paper in response["data"]:
                print(json.dumps(paper), file=file)
        # checks for continuation token to get next batch of results
        if "token" not in response:
            break
        response = requests.get(f"{url}&token={response['token']}").json()

print(f"Done! Retrieved {retrieved} papers total")
Each data object in the papers.json file contains the fields we requested, as well as the paperId.
{
    "paperId": "001720a782840652b573bb4794774aee826510ca",
    "url": "https://www.semanticscholar.org/paper/001720a782840652b573bb4794774aee826510ca",
    "title": "Developing Design Features to Facilitate AI-Assisted User Interactions",
    "openAccessPdf": null,
    "publicationTypes": null,
    "publicationDate": "2024-05-03"
}
{
    "paperId": "0019e876188f781fdca0c0ed3bca39d0c70c2ad2",
    "url": "https://www.semanticscholar.org/paper/0019e876188f781fdca0c0ed3bca39d0c70c2ad2",
    "title": "Artificial intelligence prompt engineering as a new digital competence: Analysis of generative AI technologies such as ChatGPT",
    "openAccessPdf": {
        "url": "https://eber.uek.krakow.pl/index.php/eber/article/view/2142/863",
        "status": "GOLD"
    },
    "publicationTypes": [
        "JournalArticle",
        "Review"
    ],
    "publicationDate": null
}
See the S2folks GitHub code examples for another version of this call.
Step 2: Get recommended papers
Use Case: In this section, we want to get a list of recommended papers based on a few interesting seed papers. We’re interested in the most cited papers, so we’ll request information about the recommended papers’ citation counts.
Two Recommendations API endpoints can recommend papers: one gives recommendations based on a single seed paper from the user, while the other takes a list of positive seed papers and a list of negative seed papers from the user. Both endpoints return an array of papers in descending order of relevance.
We will use the endpoint that takes two lists of positive and negative seed papers, with the URL: http://api.semanticscholar.org/recommendations/v1/papers
This is a POST request, so we need to check the endpoint’s Request Body Schema section in the API documentation, to see the format in which the data must be sent in the body of the request.

Figure 7. The Request Body Schema section describes how to format the data in a POST request.
The positive and negative seed paperIds need to be sent as two arrays, positivePaperIds and negativePaperIds.
For positivePaperIds, we’ll use two positive seed papers:
- Human-Centred AI in Education in the Age of Generative AI Tools, paperId 02138d6d094d1e7511c157f0b1a3dd4e5b20ebee
- Responsible Adoption of Generative AI in Higher Education: Developing a "Points to Consider” Approach Based on Faculty Perspectives, paperId 018f58247a20ec6b3256fd3119f57980a6f37748
For negativePaperIds, we’ll use one negative seed paper:
- A Novel Generative AI-Based Framework for Anomaly Detection in Multicast Messages in Smart Grid Communications, paperId 0045ad0c1e14a4d1f4b011c92eb36b8df63d65bc
In our request to this API endpoint, we provide the following query parameters:
- The fields query parameter, with the citationCount field, which returns how much that particular paper is cited by other papers. We won’t include the influentialCitationCount field here, but that field keeps track of how often the paper has a big influence on other papers.
- The limit query parameter, which limits the number of recommended papers returned. We’ll set this to the max value of 500.
In a new Python script, the request is formatted and sent to the API endpoint.
import requests
import json

# Define the API endpoint URL
url = "https://api.semanticscholar.org/recommendations/v1/papers"

# Define the query parameters
query_params = {
    "fields": "title,url,citationCount,authors",
    "limit": "500"
}

# Define the request data
data = {
    "positivePaperIds": [
        "02138d6d094d1e7511c157f0b1a3dd4e5b20ebee",
        "018f58247a20ec6b3256fd3119f57980a6f37748"
    ],
    "negativePaperIds": [
        "0045ad0c1e14a4d1f4b011c92eb36b8df63d65bc"
    ]
}

# Directly define the API key (Reminder: Securely handle API keys in production environments)
api_key = "your api key goes here"  # Replace with the actual API key

# Define headers with API key
headers = {"x-api-key": api_key}

# Send the API request
response = requests.post(url, params=query_params, json=data, headers=headers).json()

# Sort the recommended papers by citation count
papers = response["recommendedPapers"]
papers.sort(key=lambda paper: paper["citationCount"], reverse=True)

with open('recommended_papers_sorted.json', 'w') as output:
    json.dump(papers, output)
A successful request returns a response with the recommendedPapers parameter. Since we want to see the most cited papers, the papers are sorted by the citationCount parameter, then the results are written to a JSON file, recommended_papers_sorted.json:
[
    {
        "paperId": "833ff07d2d1be9be7b12e88487d5631c141a2e95",
        "url": "https://www.semanticscholar.org/paper/833ff07d2d1be9be7b12e88487d5631c141a2e95",
        "title": "Teacher Professional Development on Self-Determination Theory\u2013Based Design Thinking in STEM Education",
        "citationCount": 24,
        "authors": [
            {
                "authorId": "2281351310",
                "name": "Thomas K. F. Chiu"
            },
            {
                "authorId": "2281342663",
                "name": "C. Chai"
            },
            {
                "authorId": "2300302076",
                "name": "P. J. Williams"
            },
            {
                "authorId": "2300141520",
                "name": "Tzung-Jin Lin"
            }
        ]
    },
    {
        "paperId": "144b8d9c10ea111598aa239100cd6ed5c6137b1c",
        "url": "https://www.semanticscholar.org/paper/144b8d9c10ea111598aa239100cd6ed5c6137b1c",
        "title": "Artificial intelligence as part of future practices in the architect\u2019s work: MidJourney generative tool as part of a process of creating an architectural form",
        "citationCount": 19,
        "authors": [
            {
                "authorId": "2300748516",
                "name": "Anna Jaruga-Rozdolska"
            }
        ]
    },
The recommended papers are now sorted in descending order of citation count, with a paper with 24 citations at the top of the list.
See the S2folks GitHub for an example of using the recommendations endpoint that takes a single seed paper.
Step 3: Look up authors
Use Case: We want to get more information about the authors of the highest cited paper.
The batch authors endpoint in Academic Graph API can return information about multiple authors: https://api.semanticscholar.org/graph/v1/author/batch.
This endpoint is a POST, and it accepts an array of authorIds called ids in the request body. The array includes authorIds of the four authors of the most cited paper:
- 2281351310
- 2281342663
- 2300302076
- 2300141520
The only query parameter accepted by the endpoint is fields, where we can request more detailed information about the authors, including:
- The author name
- The url of the author’s page on Semantic Scholar
- Their number of papers in Semantic Scholar, called paperCount
- The author’s hIndex, a measure of their research impact
- An array of all papers by the author in Semantic Scholar
In a new Python script, the request is sent to the API endpoint.
import requests
import json

# Define the API endpoint URL
url = "https://api.semanticscholar.org/graph/v1/author/batch"

# Define the query parameters
query_params = {
    "fields": "name,url,paperCount,hIndex,papers"
}

# Define the request data
data = {
    "ids": ["2281351310","2281342663","2300302076","2300141520"]
}

# Directly define the API key (Reminder: Securely handle API keys in production environments)
api_key = "your api key goes here"  # Replace with the actual API key

# Define headers with API key
headers = {"x-api-key": api_key}

# Send the API request
response = requests.post(url, params=query_params, json=data, headers=headers).json()

# Save the results to json file
with open('author_information.json', 'w') as output:
    json.dump(response, output)
The successful request returns an array of objects that contain author information.
[
    {
        "authorId": "2281351310",
        "url": "https://www.semanticscholar.org/author/2281351310",
        "name": "Thomas K. F. Chiu",
        "paperCount": 2,
        "hIndex": 1,
        "papers": [
            {
                "paperId": "630642b7040a0c396967e4dab93cf73094fa4f8f",
                "title": "An experiential learning approach to learn AI in an online workshop"
            },
            {
                "paperId": "833ff07d2d1be9be7b12e88487d5631c141a2e95",
                "title": "Teacher Professional Development on Self-Determination Theory\u2013Based Design Thinking in STEM Education"
            }
        ]
    },
See the S2folks GitHub for other interesting examples of using the author endpoints.
Additional Resources
Pagination
Pagination is a technique used in APIs to manage and retrieve large sets of data in smaller, manageable chunks. This is particularly useful when dealing with extensive datasets to improve efficiency and reduce the load on both the client and server.
Some Semantic Scholar endpoints, like paper relevance search, require the use of the limit and offset parameters to handle pagination:
- Limit: Specifies the maximum number of items (e.g., papers) to be returned in a single API response. For example, in the request https://api.semanticscholar.org/graph/v1/paper/search?query=halloween&limit=3, the limit=3 indicates that the response should include a maximum of 3 papers.
- Offset: Represents the starting point from which the API should begin fetching items. It helps skip a certain number of items. For example, if offset=10, the API will start retrieving items from the 11th item onward.
Other endpoints, like paper bulk search, require the use of the token parameter to handle pagination:
- Token: A “next” token or identifier provided in the response, pointing to the next set of items. It allows fetching the next page of results.
In either case, the client requests the API for the first page of results. The API responds with a limited number of items. If there are more items to retrieve, the client can use the offset parameter or the next token in subsequent requests to get the next page of results until all items are fetched. This way, pagination allows clients to retrieve large datasets efficiently, page by page, based on their needs.
Examples using search query parameters
Semantic Scholar’s paper bulk search supports a variety of operators that enable advanced filtering and precise specifications in search queries. All keywords in the search query are matched against words in the paper’s title and abstract. Refer to the API Documentation for all supported operators. Below are examples of varying complexity to help you get started.
Example 1.
((cloud computing) | virtualization) +security -privacyMatches papers containing the words "cloud” and “computing", OR the word "virtualization" in their title or abstract. The paper title or abstract must also include the term "security" but should exclude the word "privacy". For example, a paper with the title "Ensuring Security in Cloud Computing Environments" could be included, unless its abstract contains the word “privacy”.
Example 2.
"red blood cell" + artificial intelligenceMatches papers where the title or abstract contains the exact phrase “red blood cell” along with the words “artificial” and “intelligence”. For example, a paper with the title "Applications of Artificial Intelligence in Healthcare" would be included if it also contained the phrase “red blood cell” in its abstract.
Example 3.
fish*Matches papers where the title or abstract contains words with “fish” in their prefix, such as “fishtank”, “fishes”, or “fishy”. For example a paper with the title "Ecology of Deep-Sea Fishes" would be included.
Example 4.
bugs~3Matches papers where the title or abstract contains words with an edit distance of 3 from the word “bugs”, such as “buggy”, “but”, "buns", “busg”, etc. An edit is the addition, removal, or change of a single character.
Example 5.
“blue lake” ~3Matches papers where the title or abstract contains phrases with up to 3 terms between the words specified in the phrase. For example, a paper titled “Preserving blue lakes during the winter” or with an abstract containing a phrase such as “blue fishes in the lake” would be included.
How to download full datasets
Semantic Scholar datasets contain data on papers, authors, abstracts, embeddings, and more. Datasets are grouped by releases, and each release is a snapshot of the datasets at the time of that release date. Make requests to the Datasets API to see the list of available release dates, to list the datasets contained in a given release, and to download links to datasets.
All Semantic Scholar datasets are delivered in JSON format.
Step 1: See all release dates
Use the list of available releases endpoint to see all dataset release dates.
import requests

# Define base URL for datasets API
base_url = "https://api.semanticscholar.org/datasets/v1/release/"

# To get the list of available releases make a request to the base url. No additional parameters needed.
response = requests.get(base_url)

# Print the response data
print(response.json())
The response is a list of release dates, which contain all releases through the date the request was made:

Step 2: See all datasets for a given release date
Use the list of datasets in a release endpoint to see all datasets contained in a given release. The endpoint takes the release_id, which is simply the release date, as a query parameter. The release_id can also be set to “latest” instead of the actual date value to retrieve datasets from the latest release.
import requests

base_url = "https://api.semanticscholar.org/datasets/v1/release/"

# Set the release id
release_id = "2023-10-31"

# Make a request to get datasets available the latest release
response = requests.get(base_url + release_id)

# Print the response data
print(response.json())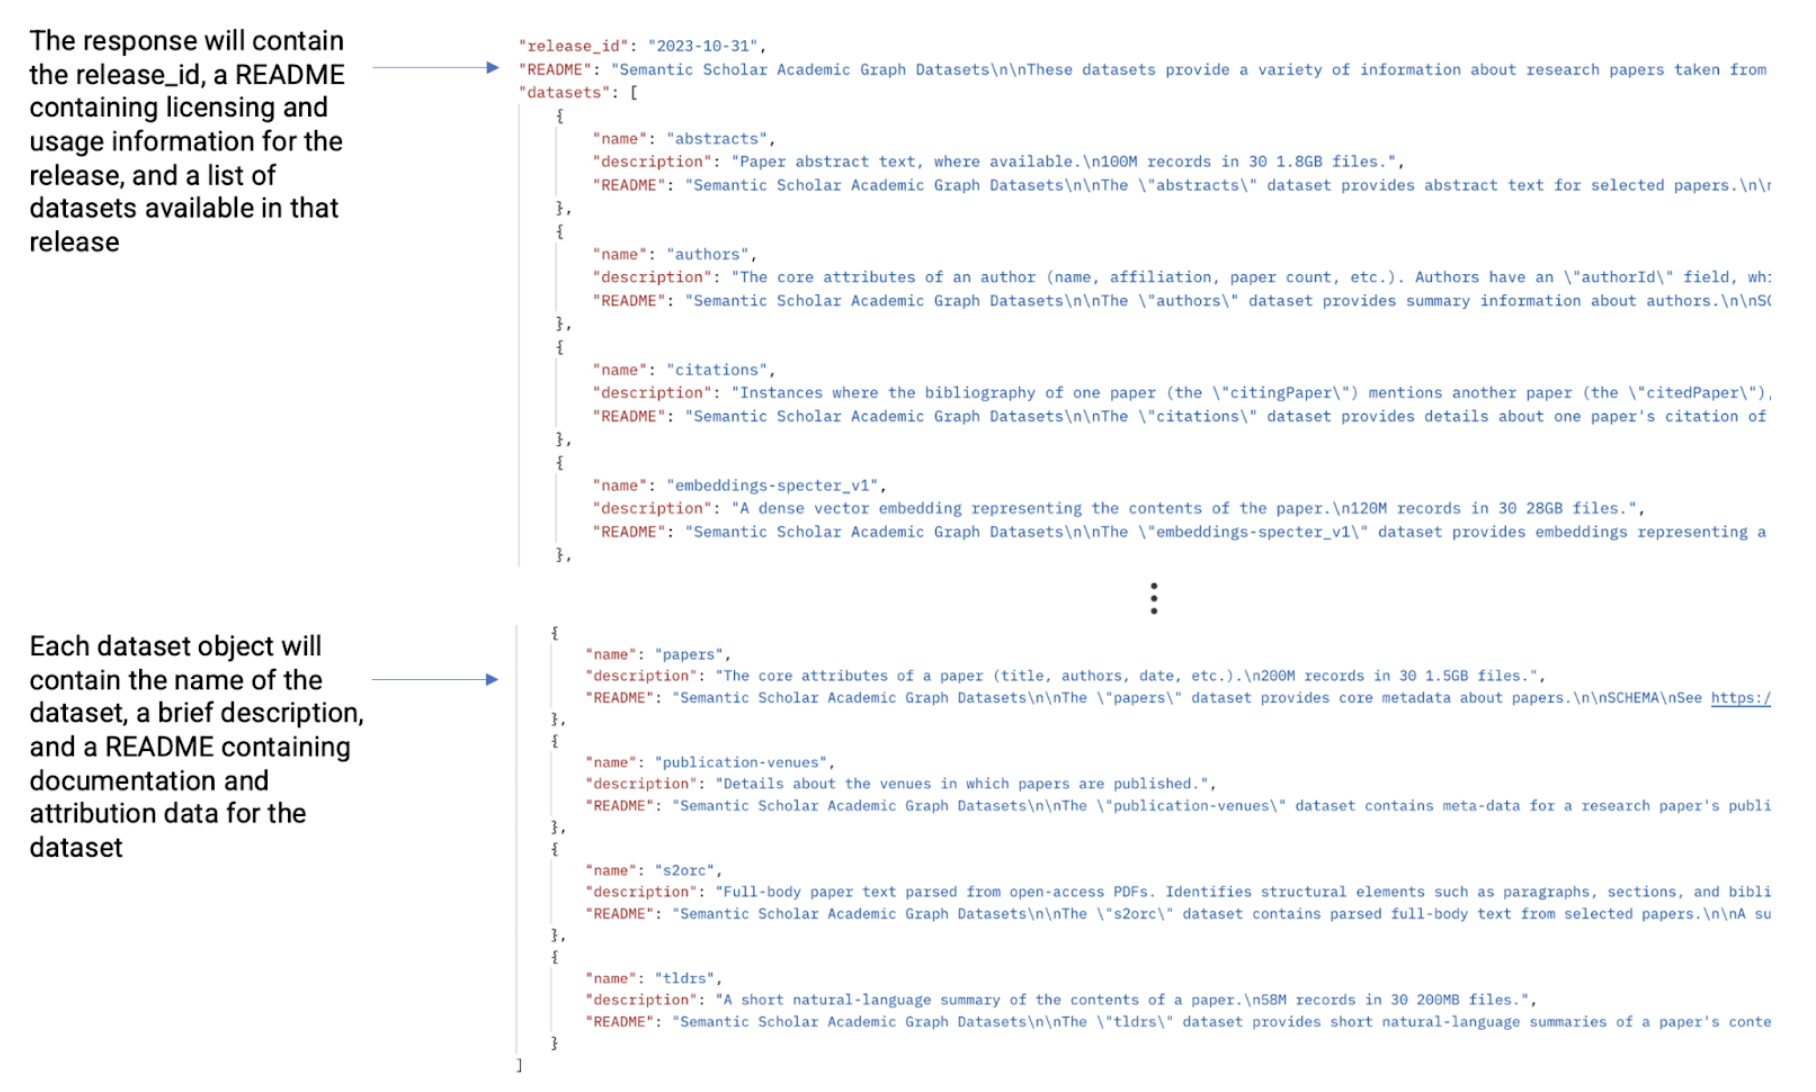
Step 3: Get download links for datasets
Use the download links for a dataset endpoint to get download links for a specific dataset at a specific release date. This step requires the use of a Semantic Scholar API key.
import requests

base_url = "https://api.semanticscholar.org/datasets/v1/release/"

# This endpoint requires authentication via api key
api_key = "your api key goes here"
headers = {"x-api-key": api_key}

# Set the release id
release_id = "2023-10-31"

# Define dataset name you want to download
dataset_name = 'papers'

# Send the GET request and store the response in a variable
response = requests.get(base_url + release_id + '/dataset/' + dataset_name, headers=headers)

# Process and print the response data
print(response.json())
The response contains the dataset name, description, a README with license and usage information, and temporary, pre-signed download links for the dataset files:

How to update datasets with incremental diffs
The incremental diffs endpoint in the Datasets API allows users to get a comprehensive list of changes—or “diffs”—between any two releases. Full datasets can be updated from one release to another to avoid downloading and processing data that hasn't changed. This endpoint requires the use of a Semantic Scholar API key.
This endpoint returns a list of all the "diffs" required to catch a given dataset up from the start release date to the end release date, with each “diff” object containing only the changes from one release to the next sequential release.
Each "diff" object itself contains two lists of files: an "update files" list and a "delete files" list. Records in the "update files" list need to be inserted or replaced by their primary key. Records in the "delete files" list should be removed from your dataset.
import requests

# Set the path parameters
start_release_id = "2023-10-31"
end_release_id = "2023-11-14"
dataset_name = "authors"

# Set the API key. For best practice, store and retrieve API keys via environment variables
api_key = "your api key goes here"
headers = {"x-api-key": api_key}

# Construct the complete endpoint URL with the path parameters
url = f"https://api.semanticscholar.org/datasets/v1/diffs/{start_release_id}/to/{end_release_id}/{dataset_name}"

# Make the API request
response = requests.get(url, headers=headers)


# Extract the diffs from the response
diffs = response.json()['diffs']
print(diffs)
Tips for working with downloaded datasets
Explore the following sections for inspiration on leveraging your downloaded data. Please be aware that the tools, libraries, and frameworks mentioned below are not a comprehensive list and their performance will vary based on the size of your data and machine’s capabilities. They are all external tools with no affiliation to Semantic Scholar, and are simply offered as suggestions to facilitate your initial exploration of our data.
Command line tools
Perhaps the simplest way to view your downloaded data is via the command line through commands like more and tools like jq.
1. The more command
You can use the more command without installing any external tool or library. This command is used to display the contents of a file in a paginated manner and lets you page through the contents of your downloaded file in chunks without loading up the entire dataset. It shows one screen of text at a time and allows you to navigate through the file using the spacebar (move forward one screen) and Enter (move forward one line) commands.
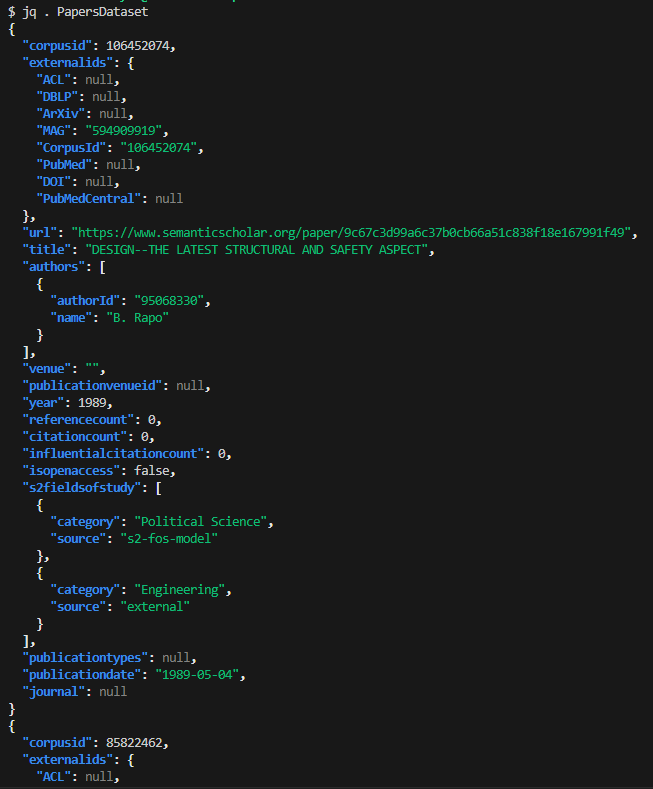
Example: You downloaded the papers dataset, and renamed the file to “papersDataset”. Use the “more papersDataset” command to view the file:
2. The jq tool
jq is a lightweight and flexible command-line tool for exploring and manipulating JSON data. With jq, you can easily view formatted json output, select and view specific fields, filter data based on conditions, and more.
Example: You downloaded the papers dataset, and renamed the file to “papersDataset”. The jq command to format output is jq ‘.’ <file-name>, so use the jq . papersDataset command to view the formatted file:
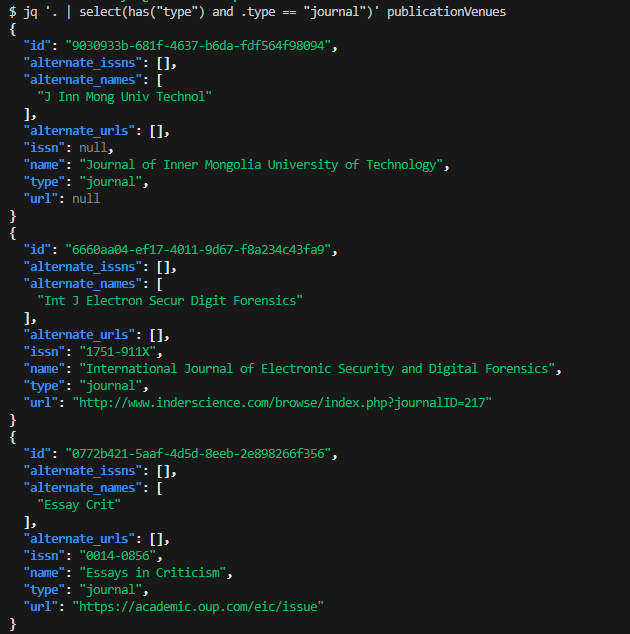
Example: You want to filter publication venues that are only journals. You can use jq to filter json objects by a condition with the command jq ‘ . | select(has(“type”) and .type == “journal”)’ publicationVenues
Python Pandas library
Pandas is a powerful and easy-to-use data analysis and manipulation library available in Python. Using Pandas, you can effortlessly import, clean, and explore your data. One of the key structures in Pandas is a DataFrame, which can be thought of as a table of information, akin to a spreadsheet with rows and columns. Each column has a name, similar to a header in Excel, and each row represents a set of related data. With a DataFrame, tasks like sorting, filtering, and analyzing your data are straightforward. Now we will see how to leverage basic Pandas functions to view and explore our Semantic Scholar data in a DataFrame.
Example: The head function. In Pandas you can use the head( ) function to view the initial few rows of your dataframe.
import pandas as pd

# Read JSON file into Pandas DataFrame. The ‘lines’ parameter indicates that our file contains one json object per line
df = pd.read_json('publication venues dataset', lines=True)

# Print the first few rows of the DataFrame
print(df.head())
The output is below. You will notice that this is a very wide dataframe, where each column represents a field in our json object (e.g. id, name, issn, url, etc.). By default pandas only shows the first and last columns. To view all the columns, you can configure the pandas display settings before printing your output, with pd.set_option('display.max_columns', None)

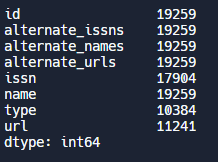
Example: The count function. We can use the count( ) function to count the number of rows that have data in them (e.g. not null). This can be useful to test the quality of your dataset.
# Display count of non-null values for each column
print(df.count())
Output:
Example: Filtering. We can filter our data by specifying conditions. For example, let’s assume we have loaded our authors' dataset into a dataframe, and want to filter by authors who have written at least 5 papers and been cited at least 10 times. After applying this filter, let's select and display only the authorid, name, papercount, and citationcount fields.
#filter dataframe by authors who have more than 5 publications and have been cited at least 10 times
df = df[(df.papercount >= 5) & (df.citationcount >= 10)]

# Select and print a subset of the columns in our filtered dataframe
print(df[['authorid', 'name', 'papercount', 'citationcount']])
Output:

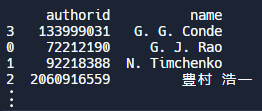
Example: Sorting. Pandas offers a variety of sorting functions to organize our data. In the example below, we use the sort_values( ) function to sort the dataframe by the “name” column and only display the authorid and name columns. The default is ascending order, so in this case our output will list authors in alphabetical order. e can filter our data by specifying conditions. For example, let’s assume we have loaded our authors' dataset into a dataframe, and want to filter by authors who have written at least 5 papers and been cited at least 10 times. After applying this filter, let's select and display only the authorid, name, papercount, and citationcount fields.
#Let's sort our authors in alphabetical order
df = df.sort_values(by='name')
Output:
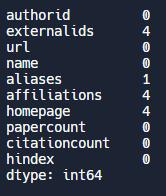
Example: Check for missing values. Let’s say we want to assess the quality of our data by checking for missing (null) values. We can count how many missing values we have by using the isnull() and sum() functions.
# Count and print the number of missing values for each author attribute
print(df.isnull().sum())
Output:
Apache Spark (Python examples)
Apache Spark is a fast and powerful processing engine that can analyze large-scale data faster than traditional methods via in-memory caching and optimized query execution. Spark offers APIs for a variety of programming languages, so you can utilize its capabilities regardless of the language you are coding in. In our examples we will showcase the Spark Python API, commonly known as PySpark.
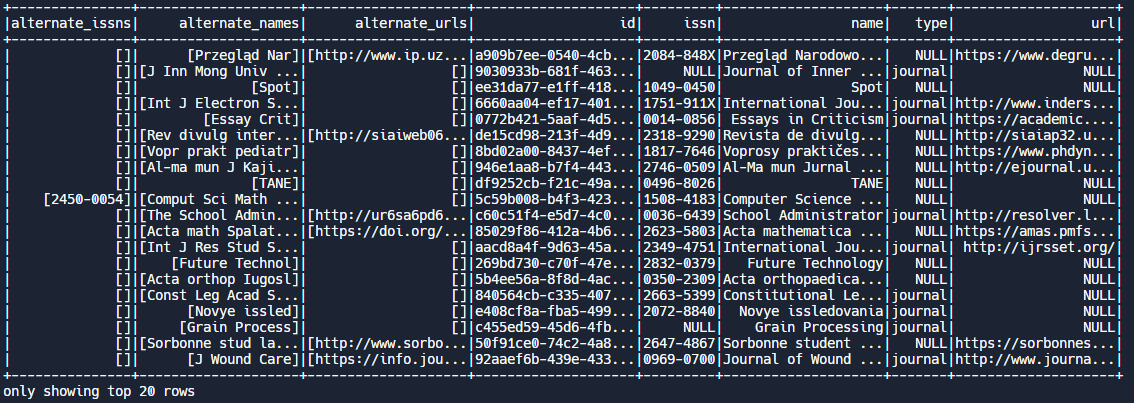
Example: The show function. PySpark’s show( ) function is similar to print( ) or head( ) in pandas and will display the first few rows of data. Let’s load up our publication venues data into a PySpark DataFrame and see how it looks:
from pyspark.sql import SparkSession

# Create a Spark session
spark = SparkSession.builder.appName("dataset_exploration").getOrCreate()

# Read the dataset file named 'publication venues dataset' into a PySpark DataFrame. Depending on the directory you are working from you may need to include the complete file path.
df = spark.read.json("publication venues dataset")

# Display the first few rows
df.show()
Output:
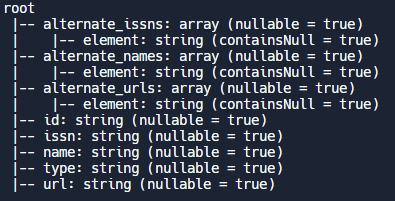
Example: The printSchema function. PySpark offers a handy printSchema( ) function if you want to explore the structure of your data
# Display the object schema

df.printSchema()
Output:
Example: Summary statistics. PySpark offers a handy describe( ) function to delve into and display summary statistics for the specified columns in our dataset. In this example we describe the papercount, citationcount, and orderBy attributes of our author data. In the results we can see the average papercount of authors in this dataset, along with their average citationcount, hindex, and other common statistical measures.
df.describe(["papercount", "citationcount", "hindex"]).show()Output:

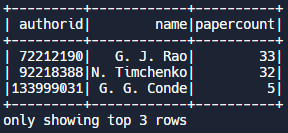
Example: Sorting. We can call the orderBy( ) function and specify the column we want to sort by, in this case papercount. We also call the desc() function to sort in descending order (from highest to lowest papercount). We also only want to display the authorid, name, and papercount fields, and display the top 3 records.
df = df.orderBy(col("papercount").desc())
df.select("authorid", "name", "papercount").show(3)
Output:
MongoDB
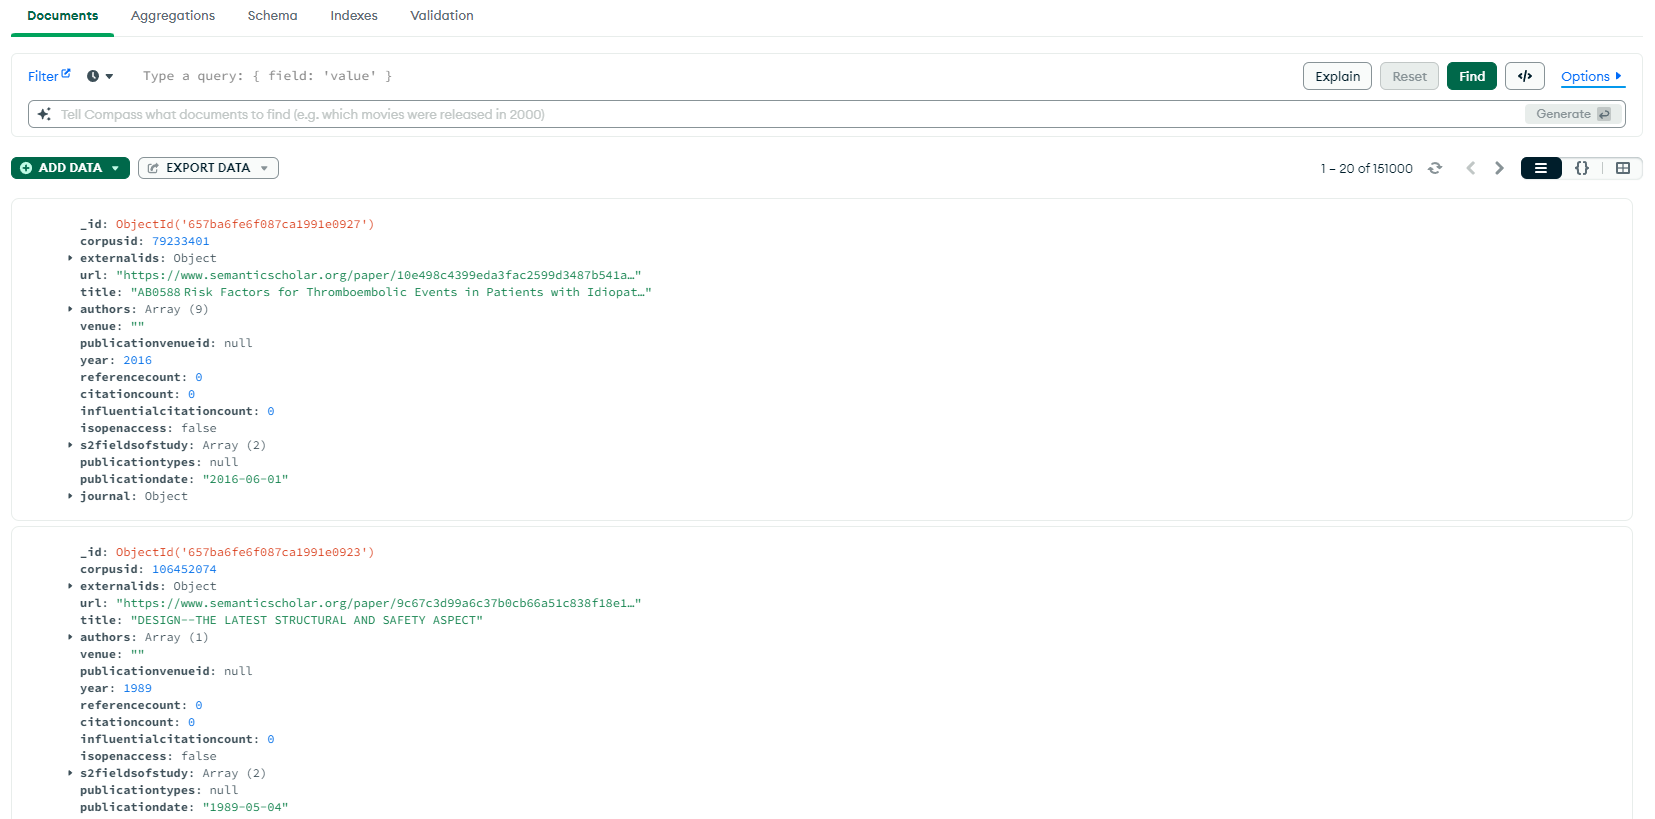
MongoDB is a fast and flexible database tool built for exploring and analyzing large scale datasets. Think of it as a robust digital warehouse where you can efficiently organize, store, and retrieve large volumes of data. In addition, MongoDB is a NoSQL database that stores data in a flexible schema-less format, scales horizontally, supports various data models, and is optimized for performance. MongoDB offers both on-premise and fully managed cloud options (Atlas) and can be accessed via the Mongo shell or a GUI (known as Mongo Compass). You can check out our guide on setting up Mongo if you need help getting started. In the example below, we have imported a papers dataset into a Mongo Atlas cluster and show you how to leverage the Mongo Compass GUI to view and explore your data.
Once you have imported your data, you can view it via Compass as shown in the example below. You can leverage the Compass documentation to discover all its capabilities. We have listed some key items on the user interface to get you acquainted:
- Data can be viewed in the default list view (shown below), object view, or table view by toggling the button on the upper right hand corner. In the list view, each ‘card’ displays a single record, or in this case a paper object. Notice that MongoDB appends its own ID, known as ObjectId to each record.
- You can filter and analyze your data using the filter pane at the top of the screen, and click on the Explain button to see how your filters were applied to obtain your result set. Note that since Mongo is a NoSQL database, it has a slightly different query language from SQL to use for filtering and manipulation.
- The default tab is the Documents tab where you can view and scroll through your data. You can also switch to the Aggregations tab to transform, filter, group, and perform aggregate operations on your dataset. In the Schema tab, Mongo provides an analysis of the schema of your dataset. When you click on the Indexes tab, you will find that the default index for searches is Mongo’s ObjectId. If you believe you will perform frequent searches using another attribute (e.g. corpusid), you can add an additional index to optimize performance.
- You can always add more data to your dataset via the green Add Data button right under the filter query bar
Setting Up MongoDB
You have the option of installing MongoDB onto your machine, or using their managed database-as-a-service option on the cloud, otherwise known as Atlas. Once you set up your database, you can download the GUI tool (Mongo Compass) and connect it to your database to visually interact with your data. If you are new to mongo and want to just explore, you can setup a free cluster on Atlas with just a few easy steps:
Set Up a Free Cluster on MongoDB Atlas:
- Sign Up/Login:
1.1. Visit the MongoDB Atlas website.
1.2. Sign up for a new account or log in if you already have one. - Create a New Cluster:
2.1. After logging in, click on "Build a Cluster."
2.2. Choose the free tier (M0) or another desired plan.
2.3. Select your preferred cloud provider and region. - Configure Cluster:
3.1. Set up additional configurations, such as cluster name and cluster tier.
3.2. Click "Create Cluster" to initiate the cluster deployment. It may take a few minutes.
Connect to MongoDB Compass:
- Download and Install MongoDB Compass:
1.1. Download MongoDB Compass from the official website.
1.2. Install the Compass application on your computer. - Retrieve Connection String:
2.1. In MongoDB Atlas, go to the "Clusters" section.
2.2. Click on "Connect" for your cluster.
2.3. Choose "Connect Your Application."
2.4. Copy the connection string. - Connect Compass to Atlas:
3.1. Open MongoDB Compass.
3.2. Paste the connection string in the connection dialog.
3.3. Modify the username, password, and database name if needed.
3.4. Click "Connect."
Import Data:
- Create a Database and Collection:
1.1. In MongoDB Compass, navigate to the "Database" tab.
1.2. Create a new database and collection by clicking "Create Database" and "Add My Own Data." - Import Data:
2.1. In the new collection, click "Add Data" and choose "Import File."
2.2. Select your JSON or CSV file containing the data.
2.3. Map fields if necessary and click "Import." - Verify Data:
3.1. Explore the imported data in MongoDB Compass to ensure it's displayed correctly.
Now, you have successfully set up a free cluster on MongoDB Atlas, connected MongoDB Compass to the cluster, and imported data into your MongoDB database. This process allows you to start working with your data using MongoDB's powerful tools.
TIP: We recommend checking the Mongo website for the latest installation instructions and FAQ in case you run into any issues.
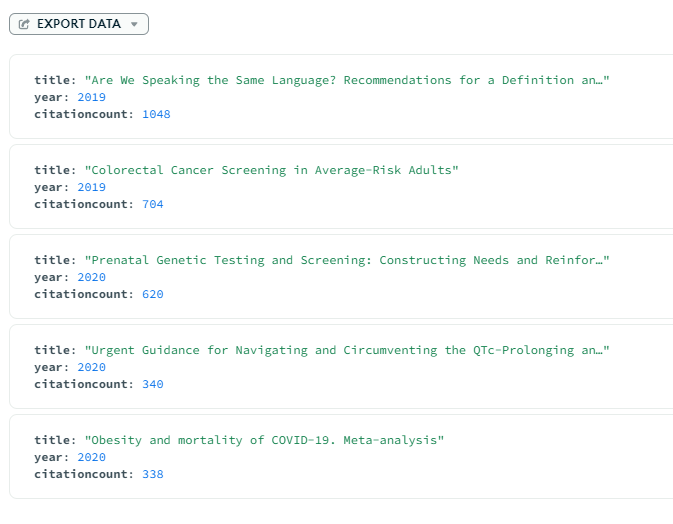
Example: Querying, Filtering, and Sorting. Using the Mongo Compass GUI we can filter and sort our dataset per our needs. For example, let's see which papers in Medicine were cited the most in the last 5 years, and exclude any papers with under 50 citations. In the project field we choose which fields we would like to display in the output, and we sort in descending order by citationcount
{
   's2fieldsofstudy.category': 'Medicine',
   'citationcount': {
       '$gte': 50
   },
   'year': {
       '$gte': 2019,
       '$lte': 2023
   }
}
Output:
Working with Multiple Datasets
Oftentimes we may want to combine information from multiple datasets to gather insights. Consider the following example:
Use case: Let’s delve into a publication venue, such as the “Journal of the Geological Society”, and learn more about the papers that have been published in it. Perhaps we would like to gather the names of authors who have published a paper in this journal, but only those whose papers have been cited at least 15 times. We can combine information from the publication venues dataset and the papers dataset to find the authors that meet this criteria. To do this, we can load our datasets into pandas dataframes and retrieve the publication venue ID associated with the “Journal of the Geological Society” from the publication venues dataset. Then we can search the papers dataset for papers that have a citationcount of at least 15 and are tagged to that venue ID. Finally we can collect the names of authors associated with each of those papers that met our criteria. From this point you can explore other possibilities, such as viewing other papers published by those authors, checking out their homepage on the Semantic Scholar website, and more.
Python Example:
import pandas as pd
# Create Pandas DataFrames
papers_df = pd.read_json('papersDataset', lines=True)
venues_df = pd.read_json('publicationVenuesDataset', lines=True)
# Find the venue id for our publication venue of interest - "Journal of the Geological Society"
publication_venue_id = venues_df.loc[venues_df["name"] == "Journal of the Geological Society", "id"].values[0]
# Filter papers based on the venue id with a citation count of at least 15
filtered_geology_papers = papers_df.loc[
(papers_df["publicationvenueid"] == publication_venue_id) & (papers_df["citationcount"] >= 15)
]
# Traverse the list of authors for each paper that met our filter criteria and collect their names into a list
author_names = []
for authors_list in filtered_geology_papers["authors"]:
author_names.extend(author["name"] for author in authors_list)
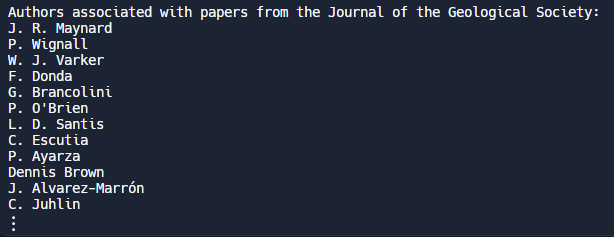
# Print the resulting author names, with each name on a new line
print("Authors associated with papers from the Journal of the Geological Society:")
print(*author_names, sep="\n")Output: